Celebrating 14 years of HOOP-TRIX!
THANKS to all the hoopers who have made the tutorials over the years, HOOP-TRIX would not exist without you!
If you'd like to help keep HOOP-TRIX.com up & running, please donate HERE, thanks!
How I Make my LED GLOW HOOPS
TUTORIAL! Make a RAINBOW LED HOOP!!

Disclaimer: Please be safe when working with electricity & tools. Wear safety goggles & be attentive when working with batteries. I am not responsible for any damage caused to you or your products.
TUBE SIZE: 5/8"OD
CONNECTORS SIZE: 1/2"OD
XSmall Push Buttons
In this tutorial, I'll show you how to make your own Rainbow LED Hoop!
This hoop is made with 21 LEDs, & is very light because it's made from 5/8"OD polypro (or you can use HDPE) and uses a single 14400 (AAA sized) 3.7V battery.
TUBE SIZE: 3/4"OD
CONNECTORS SIZE: 5/8"OD
Small Push Buttons
This set up can also be made using 3/4"OD tubing, (with 2 @5/8"OD polycarb inserts) & using a 14500 (AA sized) 3.7V battery.
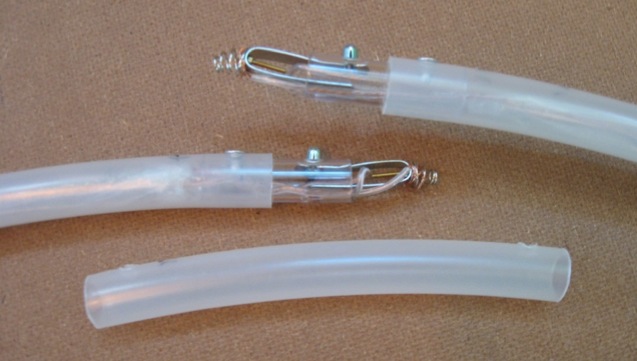
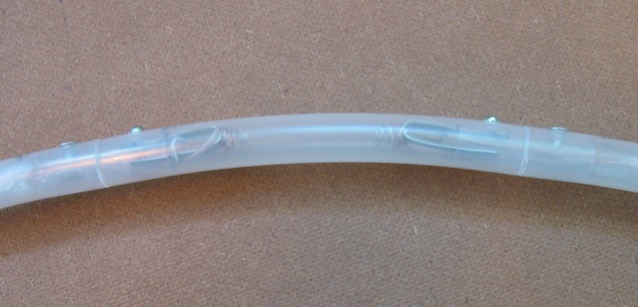
Connecting the Battery Spring to the Push Button
In the video, you'll notice that I attach the battery spring to the push button with tiny nuts & bolts. This requires that a small hole be drilled in the end of the push button, which is tricky to do. I didn't have much luck drilling the holes myself, so I took my push buttons to a machine shop & they drilled them for me on a huge drill press. This may not be an option for everyone, so I have been trying to come up with an alternative solution. You can try & solder them on, but I didn't have much luck with that & besides, I really hate to solder! You could try epoxy or glue, but I have not tried those, so I can't tell you how well they work. What I have tried is Sugru. If you're not familiar with it, google it. I bought it at Lowes or you can order it online in many different colors. It seems to hold well & hopefully it will last for a long time!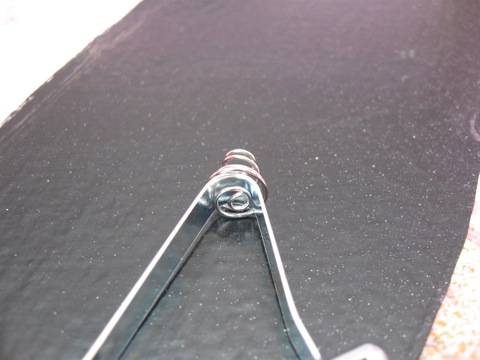


Tools
Pipe Cutter
Hardware Stores, Plumbing Section
Measuring Tape
Fabric or Craft Stores
Safety Goggles or Glasses
Sharpies
Wire Cutter or Scissors
Ruler
Wire Stripper
Hardware Stores
&/or Self Adjusting Wire Stripper
Hardware Stores
Drill &/or Dremel with bits:
13/64 for push button hoop hole
1/8 for rivets
other (push button end hole)
Rivet Gun
Hardware Stores
String (Heavy/Strong)
Small Fishing Weight
Walmart
If Needed/Optional:
Battery Holder (for testing)
Amazon
Alligator clips
Home Depot
Mallet
Metal Strip for Drilling Protection
Tiny Nut Drivers for Tiny Screws & Nuts
MicroMark.com
Supplies
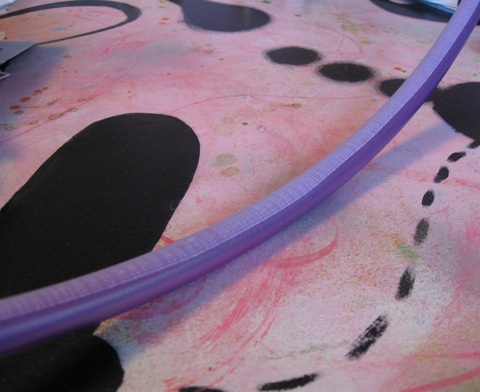
Polypro Tubing (or HDPE) 5/8" OD
Hoopologie
2 Polycarb Connectors 1/2" OD, 1-5/8" length
Hoopologie
24 gauge Speaker Wire
Home Depot
White or transparent Electrical Tape
FindTape or Hardware Stores
LEDs--Pink, Purple (bright white with purple sharpie), Blue, Green
Red, Orange, Yellow (will need resistors)
Ebay.com (search for 5mm LEDS)
LEDs (Red, Orange, Yellow) that do not require resistors
Prodmod.com (I'm not sure if he still sells them or not)
Resistors for the Red, Orange & Yellow--68 Ohms
Amazon or eBay
Bubble Wrap or
Clear Plastic Sleeve
Clear tape
2 @1/8" Aluminum Rivets
Hardware Stores
2 @XSmall Push Buttons (5/8"OD HOOP)
or Small Push Buttons (3/4"OD HOOP)
Hoopologie
2 @Tiny Screws (0-80,1-72, 2-56)
I used 0-80s in the tutorial, but you may wanna consider the larger sizes listed above, they may be easier to handle. Just make sure that the size you choose will fit through the hole in your battery spring.
MicroMark.com
2 @Tiny Nuts
MicroMark.com
2 @Tiny Washers
You may also need some tiny washers, depending on what screw size you go with.
MicroMark.com
2 @Small Battery Springs
Digikey.com
DipMicro.com
Epoxy or Other Glue for Tiny Screws
OR, Instead of the Tiny Screws & Bolts try:
Sugru
To attach the battery springs to the push buttons
(See notes above)
Battery-3.7V Trustfire (PROTECTED) 10400 (AAA sized)
Battery Junction
AND...Don't forget some GRIP!! (see more info about these at the bottom of this page.)
Both of these offer the ultimate in grip without covering your LED hoop in tape:
Hoop Grip Sticks
Hoop Makers
Grip Tape
Amazon or Hoopologie
Low Profile Grip Tape
Hoopologie
Calculate Your Tubing Length & LED Spaces
The hoop that I made in the video is 34" in diameter, with a total tube length of approx 108" (including the battery holder connector piece). The LEDs are spaced 5" apart.
This is how I figured that out:
The connector piece should always measure 5-3/8" (to get the correct battery space for the AAA sized battery)
So the rest my tubing measured 102-3/8". Deduct about a 1/2" from each end of that (space for the connectors) & you get about 101". I used 21 LEDs, which means 20 spaces between them (not counting the battery space).
101" divided by 20 spaces = 5.05" space measurement between the LEDs.
If you want to make a different size hoop, or use a different number of LEDs, then just figure it out the same way!
LED Resistor Calculators
http://ledcalc.com/#calc
http://www.quickar.com/noqbestledcalc.htm
Sharpies:
----------------------------------------
!OH MY GOSH! DISCOVERY ABOUT LEDS!
I discovered something WONDERFUL. I've been unhappy with the UV purple LED bulbs that are available, they always seem to be too dim. So.... I started thinking about what I could do to brighten them up a bit, especially when building a RAINBOW hoop. I thought, what if I took some white LEDs & colored them with Sharpie permanent markers?
BINGO!! a nicer brighter PURPLE LED!!! Other colors work as well.
Here's what I've found from lots of experimentation:
• white leds are available in bright white & warm white, they each look different with the colored marker on them
• word of warning--I ordered some white LEDs on ebay (Hong Kong) & the marker DID NOT stay on the bulbs. But all of the other bulbs from ebay worked, just not these particular ones for some odd reason.
• some colors look great, some not so much. purples, pinks, oranges, yellows, limes were the best.
• greens, turquoise, blues, reds not as good but useable if you don't have the regular colored LEDs.
• I tried both Sharpies & Bics. I liked the Sharpies better.
ALSO, & this is really cool too: if you try a marker color on a bulb & you don't like it, take an EXPO dry erase marker & ink over the Sharpie on the bulb, then rub off with a tissue, the Sharpie color will come off. Now you can try another color! No wasted LEDs with colors that you don't like. Genious!
The RAINBOW hoop that I made using both regular LEDs & some Sharpied LEDs is pictured below. Since I was able to use different shades of colors, the RAINBOW effect is more graduated then using blocks of colors.
Here's the breakdown of LEDs in my new RAINBOW hoop:
pink (blueish) - magenta sharpie on bright white LED
pink - regular LED
pink (reddish) - magenta sharpie on warm white LED
red - regular LED w/resistor
orange (reddish) - Prodmod LED
orange - regular LED w/resistor
orange - orange sharpie on warm white LED
yellow - regular LED w/resistor
yellow - yellow sharpie on warm white LED
lime - yellow sharpie on bright white LED
lime - lime sharpie on bright white LED
green - regular LED
green - regular LED
turquoise - Prodmod LED
blue - regular LED
blueish purple - purple sharpie on bright white LED
purple - blue sharpie on warm white LED
purple (pinkish) - purple/magenta sharpie on bright white LED
NEW RAINBOW HOOP (made with marker LEDs)
Looks even better in real life!
OLD RAINBOW HOOP (made with standard LEDs in color blocks)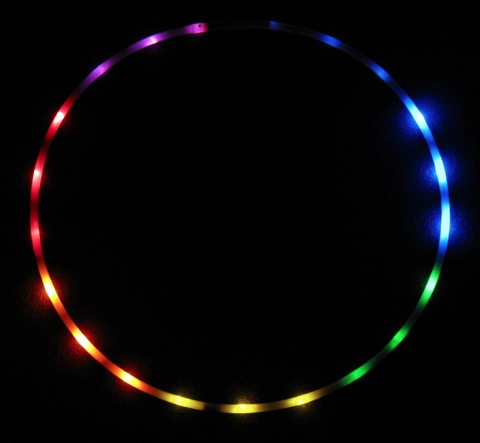
----------------------------------------
GRIP---> Grip Sticks, Sanding & Tape:
I don't tape my hoops any more, I usually use a grip stick which you can get from various hoop makers or try some Sex Wax!
If you want to sand them, use really course sandpaper grade (40, 50 or 60). This also provides a good grip, but eventually may lead to cracking or breakage of your hoop.
Super duper grippy tape by 3M.
It comes in 1" rolls but you can cut it down to 1/2" or 1/4" strips with scissors to line the inside of your hoop. When applying it, make sure you rub it down really well to get any air bubbles out. It's pretty transparent, so it's great on an led hoop, & seems pretty durable. You can order it from Hoopologie or from Amazon.
Hoopologie also sells a fabulous low grip tape.

OLDER INFO, Other Options:
When I used to tape my hoops I sometimes would use a half inch strip of gaffer tape just along the inside. I don’t really like the criss-crossing of tape that I have seen, although If you need the gaffers for extra grip then its probably a good idea.
I have also tried First Aid Clear Tape, spiral-wrapped on a few of my led hoops. It helps for grip and you can’t really see it, so it doesn’t interfere with the lights. But I don’t think its very durable, so if you use it, you may have to re-tape often.


E N J O Y ! ! !